House Leak Repair Guide to Save Money and Prevent Damage
Homeowners know that a hidden leak can lead to costly repairs and significant damage. Recognizing the signs of a house leak early is crucial for preserving your property and saving your hard-earned money. In this house leak repair guide, we’ll walk you through the step-by-step process of identifying leaks, diagnosing their causes, and implementing effective solutions. Whether it’s a dripping faucet, a damp basement, or water stains on the ceiling, tackling these issues promptly can prevent minor inconveniences from becoming major catastrophes. With practical tips and expert advice, you’ll be equipped to address leaks confidently and efficiently. Don’t let a small problem snowball into a financial burden. Dive into this house leak repair guide and take the first step toward safeguarding your home from water damage while maximizing your savings!
The Importance of Timely Leak Repair
Timely leak repair is critical for several reasons. First and foremost, it prevents further damage to your property. Water damage can weaken structural components, leading to costly repairs and compromising the safety of your home. For instance, prolonged exposure to moisture can cause wood rot, which can undermine the integrity of your floors, walls, and roof. Additionally, water can damage electrical systems, posing a fire hazard and necessitating expensive rewiring.
Secondly, addressing leaks promptly can save you money in the long run. While a small leak might seem insignificant, the cost of water loss can add up quickly. According to the Environmental Protection Agency (EPA), household leaks can waste nearly 10,000 gallons of water per year. This not only impacts your water bill but also places unnecessary strain on your local water supply. By fixing leaks as soon as they are detected, you can reduce water wastage and help protect the environment and lower your utility costs as well.
Furthermore, timely leak repair helps maintain a healthy living environment. Persistent moisture can create the perfect conditions for mold and mildew growth, which can have serious health implications. Mold spores can trigger allergies, respiratory issues, and other health problems, particularly in individuals with compromised immune systems. By repairing leaks quickly, you can prevent mold growth and ensure that your home remains a safe and healthy place for you and your family.
How to Identify Leaks in Your Home
Identifying leaks in your home involves a systematic approach to ensure no potential issues are overlooked. Here are the ways how you can identify leaks in your home.Monitor Your Water Bill
- Sudden spikes in your water bill without increased usage may indicate a hidden leak.
- Compare monthly usage to detect any unusual patterns.
Check Your Water Meter
- Turn off all water sources in your home.
- Observe the water meter—if it continues to move, there’s likely a leak.
Look For Visible Signs
- Water stains on ceilings, walls, or floors.
- Peeling paint or wallpaper.
- Warped or buckling wood floors.
- Mold or mildew, especially in unexpected places.
Inspect Common Leak Areas
- Under sinks and around plumbing fixtures.
- Behind and around toilets, bathtubs, and showers.
- Appliances like dishwashers, washing machines, and water heaters.
- Outdoor faucets, hoses, and irrigation systems.
Listen For Unusual Sounds
- Dripping, hissing, or running water when no taps are open.

Spotting the early signs of a house leak is key to preventing costly damage and ensuring effective repairs.
Tools Needed for DIY House Leak Repair
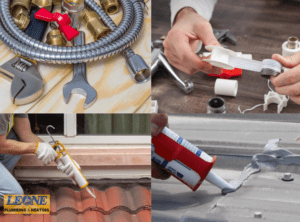
Repairing leaks in your home can be a manageable DIY task with the right materials and a bit of know-how. For roof leaks, you’ll need replacement shingles, roofing nails, a pry bar, a hammer, roofing cement or sealant, and a caulking gun. Begin by removing any damaged shingles and sliding the new ones into place, securing them with nails. For leaks around flashing or vents, apply roofing cement to seal any visible gaps or cracks. Always make sure gutters and downspouts are free from debris to prevent water from pooling and causing future leaks.
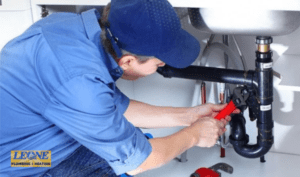
For plumbing leaks, gather materials such as a pipe wrench, Teflon tape, pipe joint compound, replacement washers or gaskets, epoxy putty, and possibly a pipe cutter and soldering tools for copper pipes. Start by turning off the water supply and draining the affected section. Disassemble the leaking joint, replace any worn components, and reseal the threads with Teflon tape or joint compound. For small holes or cracks in pipes, apply epoxy putty or use a pipe repair clamp for a quick and effective temporary fix.
Foundation leak repairs can be more complex and may require specialized tools. A foundation crack repair kit, which typically includes injection ports, epoxy or polyurethane resin, and an applicator, is essential. You may also need a masonry drill, wire brush, and concrete patching compound. For exterior foundation repairs, a shovel, wheelbarrow, and gravel or drainage tiles can help improve drainage around your home.
Having the right knowledge, tools, and materials is crucial for successful DIY leak repairs. Investing in quality equipment can save you time and frustration, ensuring that your repairs are durable and effective.
A successful DIY leak repair starts with the right knowledge, tools, and materials.
When to Call a Professional for House Leak Repair
While DIY repairs can be effective for many leaks, there are situations where professional expertise is essential. One key indicator that you need professional help is the extent of the damage. If you find significant water damage, such as large areas of mold, extensive wood rot, or widespread structural issues, it’s best to call an expert. Professionals have the tools and experience to assess the damage accurately and implement comprehensive repairs, ensuring that all underlying issues are addressed.
Another sign that you need professional assistance is the complexity of the leak. For example, leaks in your home’s foundation or those involving major plumbing systems can be challenging to repair without specialized knowledge. Foundation leaks may require extensive excavation and installation of drainage systems, while major plumbing leaks might involve replacing large sections of pipe or rerouting entire plumbing lines. Attempting these repairs without the proper skills and equipment can lead to further damage and increased repair costs in the long run.
Additionally, if you’ve attempted DIY repairs but the leak still won’t go away, it’s a clear sign that it’s time to bring in a professional. Persistent leaks can lead to serious damage if not handled properly, and continuing to troubleshoot on your own might only make the problem worse. When your efforts aren’t enough, calling a reliable plumbing service ensures the issue is diagnosed and resolved correctly the first time. A licensed plumber has the tools, experience, and expertise to handle even the most stubborn leaks quickly and efficiently.
If you’re searching for a trusted plumbing service in Rochester NY, look no further than Leone Plumbing & Heating. Known for quality work and exceptional customer care, we are your go-to experts for all types of plumbing repairs and maintenance. Choosing a professional plumbing service not only saves you time and frustration but can also help you avoid expensive water damage. Don’t let leaks spiral out of control—contact us at Leone Plumbing & Heating today for fast and dependable service in Rochester NY and surrounding areas. Whether it’s your roof, pipes, or foundation, our expert team in Rochester NY is ready to help.